Showing posts with label tee. Show all posts

Thursday, December 15, 2011

DIY Skull Cut-Out Shirt

I found this on weheartit but I'm assuming is from ImKittyRouge.


Supplies:
1. Fabric chalk
2. sharp fabric sheers
3. skull picture (google it)
4. slightly oversized tee. preferably cotton to hold the shapes of the skull better than something softer like an interlocking knit (jersey-knit).


Directions:
1. find a picture of a skull or a simple version. narrowing google images down to clip art or line art will work great.
2. draw out the skull on the back of your shirt
3. carefully cut it out with the sheers
4. find something cute to wear under it!
Read more ...

DIY Applique Leopard Print Cross Fringe Tee

There's usually enough in a print fabric remnant to make a couple of aplique shirts. Go rummage through your local fabric store's remnants and you'll be surprised what you find.


Supplies:
1. enough fabric to make a giant cross on your shirt.
2. no-sew (fabric bonding)
3. sewing machine & knowledge of basic sewing
4. matching thread
5. no fray (if the fabric you choose frays)
6. pins (if you don't use the no-sew)
7. a shirt to do this on
8. iron
9. scissors

Directions:
1. if you want an even cross, fold your fabric in half, draw, and cut out your cross shape. or w/e shape you wish.
2. iron on the no-sew bonding to the aplique
3. put the no-fray on the fabric if it frays
4. place it on the shirt where you'd like it.
5. iron it.
6. for extra hold, either do a zig-zag stitch or a straight stitch around the applique.
7. if you want the fringe look, cut the shirt as so!
Read more ...

Monday, October 31, 2011

DIY Back Appeal Shirt

Back appeal dresses and shirts have been popping up everywhere lately.
If you like a more grungy look, this shirt is for you.
Outsapop did a little post on this tee! Head over to the page to get the Full Tutorial.

Read more ...

Tuesday, March 22, 2011

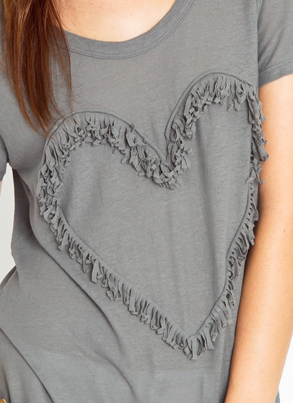
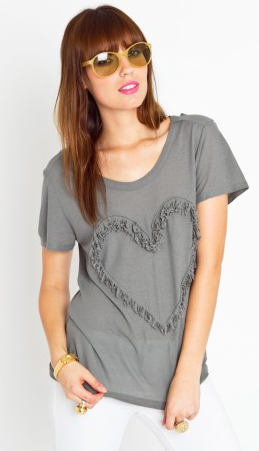
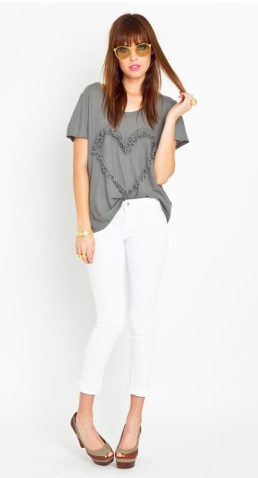
DIY Fringe Heart Tee

I love nastygal but damn they're expensive.

Browsing through their new in today and stumbled across this fringe heart tee. SUCH an easy DIY!!!

You can even make this out of one tee // especially if you want the fringe heart to be exactly the same color. It would also look super cute if you did it in a contrasting or slightly different color. Depends on the look you're going for :)

1) Get an oversized tee shirt (make sure it's fairy long unless you want a little bit of a crop top) that's nice and soft like jersey fabric.
2) Seam rip the hem off of the bottom of the tee.
3) lay the shirt flat and cut the bottom 2" of the shirt off (or however long you want the fringe to be).
4) cut that piece of tee once so it's one long strip.
5) lay the shirt flat out again and kinda lay the strip out in a heart shape to see how big you can make your heart.
6) draw out your heart shape slightly smaller than what you came up with (it's better to have a little extra fabric than not enough cuz you can always take away fabric, can't add it!)
7) Take the long strip of fabric and cut the fringe at about .25-.5 inches apart depending on how thick you want the fringe to look.
8) pin your strip of fringe down on the shirt over the chalk.
9) Sew away! make sure to not get any of the fringe in there!


You can find this Fringe Tee here at NastyGal.com for $58.00 or you could DIY for around $5 (yay cheap F21 tees haha)
Read more ...

Tuesday, March 1, 2011

DIY Cage Arm Shirt

If you're like me you have a lot of those cheap jersey knit tees from forever 21/charlotte russe laying around. Maybe you are getting bored with a few of them and wanna spice them up? Here's quick and awesome idea.

1. Lay your shirt completely flat.
2. Grab a pair of super sharp sheers.
3. Cut slits .5"-1" (depending on how thin/thick you want the cage to look)
4. You can leave them hang or kinda braid them loosly to get a different look.

Enjoy!


Courtesy of anniieemal
Read more ...

Tuesday, January 25, 2011

DIY Scribble Tee

Simplest DIY I think almost ever. It's up on the list...at least in the top ten.

I know you have plenty of white tees lying around begging to get DIYed.
Grab a big sharpie and scribble away!


Courtesy of fashiongonerogue
Read more ...

Tuesday, November 30, 2010

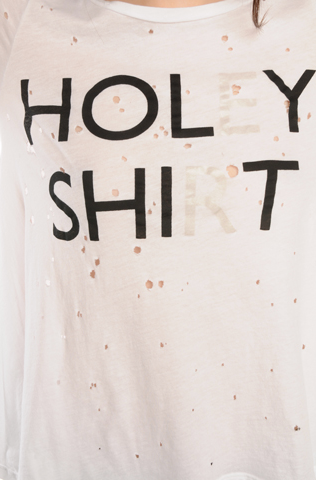
DIY HOL YSHI T Tee

I saw this on NastyGal a long time ago, but it disappeared. It is now BACK IN STOCK! YAY! But if you'd rather not pay $48 ridiculous dollars for something that only costs about 10$ tops to make, get your DIY pants on and GO!

Grab a white tee and put it on. You don't want it too tight or too loose. Grab some sharp scissors and cut tiny tiny little holes all over the tee. The reason I say put it on while doing this is you don't want the hole to end up right over your nipple or something if you're brave enough to wear it without an undershirt.
After you're done cutting the holes, take it off, lie it flat. After this there are a few options of how to do the lettering, I'll give you 2 of my ideas.
1) More expensive route: buy the iron on letters from a store in black and the E & R in white or off white if they have it. Don't get the 3D ones, get the big flat ones. Place them on & Iron away!
2) Less expensive, more time consuming: spray paint. Make a stencil for the HOLEY and SHIRT, cover up the E & R with plastic or something. Spray paint black. Let dry then cover up the other letters besides the E & R and spray paint an off white or w/e color your shirt is. So you can just barely see it.


Courtesy of: NastyGal
Read more ...

Wednesday, November 17, 2010

DIY Safety Pinned Crop

I LOVE this!

Even though I'll never be the one to wear crop tops, this is toooo chic to pass up.

Take an old black tshirt that's at least a size to big for you so the arm holes are loose. Put it on and mark where you'd like it to "crop" off at. Take it off, cut it at the crop mark then cut the sleeves in half starting at the top of the shoulder on both sides. Lay it flat and take a bunch of safety pins and pin it together using as many as you wish to achieve w/e look you're going for. Then pin the bottom of the shirt all the way around so the pins are hanging off. TA-DA!


Courtesy of: nodiscount
Read more ...

Thursday, November 4, 2010

DIY Zipper Tee & Skirt

Tee

Got a white tee lying around that's practically begging for you to DIY it? Good. Use it. A tee that's a little loose will prolly work best for this. This would also look super cute on a strapless sweetheart body-con dress! aka my personal favorite dress style! Anyways, this shirt doesn't actually have real zippers when you look close, it's just screen printed that way. I think it'd look WAY better with real zippers, don't you?

First you need lots of zippers in a set color of different lengths. I personally like the black because lets face it, you're already going to have zippers all over you, do you really need to wear zippers in neon green and pink? Prolly not. To be safe, try to find super long zippers for the most part because you can take away length, but you can't add it.

Lay your shirt down face up then lay out your zippers on top of it to see what type of design you like. Unzip part of them or all of them, twist and turn them. BE CREATIVE! It's your unique shirt, showcase that.

Once you have your set design, pin it down. Remember, if you're going to overlap and don't want a mess or a tangle in your sewing machine (unless you're an amazing seamstress and have a nicer sewing machine that has no problem going through lots of random zippers), pin down your first layer, sew it down (using black thread, or maybe white thread? Or maybe just MAYBE a colored thread for contrast? You decide.), then pin your next layer, then sew. I'd personally do it this way just so I know everything is flat and the way I'd like it.

I'd even do a sweet design in the back that continues in the front. The only reason why when you find stuff like this in stores only on the front of the shirt is because it's cheaper to print only one side of a shirt and most people don't care and would rather pay the lower price instead of having the fully printed shirt. It's not a crime, we've all done it. Money is tight now days. I get that. That's why we DIY :D

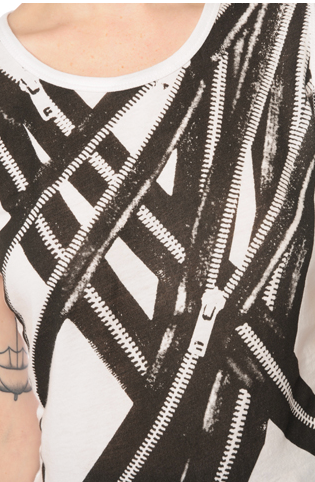


Courtesy of: ShopNastyGal

--------------------------------------------------

Skirt

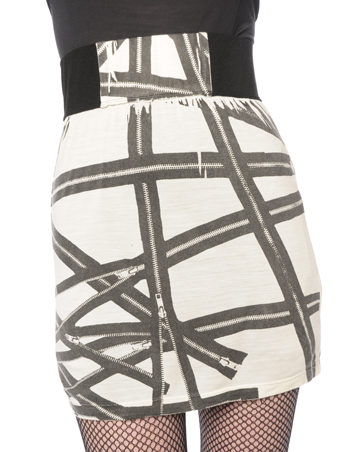
Got too many plain black or white skirts in your closet? Spice them up in the same way as I explained for the shirt above! Here's some inspiration!

Use white zippers if you have a black skirt!
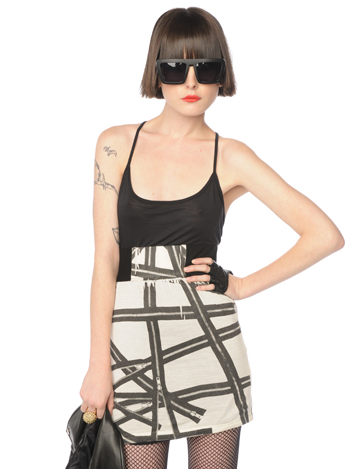


Courtesy of: ShopNastyGal
Read more ...

About Us

Total Pageviews

About Me

My photo
Follow me on twitter! @KelseyLenae